
An expert is a person who has made all the mistakes that can be made in a very narrow field
2014-11-20
Brendan Gregg,是一位 Computer performance analyst,前幾個月很有名的那張 Linux Performance Observability Tools 就是他作的。(Linux Performance Tools at LinuxCon North America 2014)
今天在網路上看到他的書裡的一段話,滿受到激勵的。資訊技術發展到現在已是博大精深,每個系統深入下去了解都有很大的學問,學習的過程難免遇到挫折、犯錯,但這些累積,就是成為專家的過程。 >For a beginner, feeling lost when you’re studying a performance issue can be discouraging. This feeling, too, is normal: you will feel lost, you will make mistakes, and you will often be wrong. Quoting Niels Bohr, a Danish physicist: An expert is a person who has made all the mistakes that can be made in a very narrow field. By telling you stories like this one, I hope to reassure you that mistakes and wrong turns are normal (even for the best of us) and to show you some techniques and methodologies to help you find your way.” > >Brendan,Gregg. “Systems Performance: Enterprise and the Cloud.” Pearson Education, 2013-10-07。
Xvfb (X virtual framebuffer)
2014-11-15
最近才知道原來有 X virtual framebuffer 這種東西,可以在 Linux Server 端先把畫面 render 好,而 Client 端只要準備好 VNC Client,就可以連過去使用。啟動 X virtual framebuffer 與 x11vnc,並且開啟 window manager 與簡單的 gnome-panel 範例如下,初步試了一下滿順暢的(我跟server之間的 Round-trip time 約 38 ms):
(以下範例的 vnc port 為6000,登入密碼為 pass)
Xvfb :33 -screen 0 800x600x16 &
x11vnc -storepasswd pass ~/.vnc/passwd
x11vnc -display :33 -geometry 800x600 -rfbauth ~/.vnc/passwd -forever -rfbport 6000 -httpport 6001 &
export DISPLAY=:33
openbox-session &
gnome-panel &
Ref. 1. fcwu/docker-ubuntu-vnc-desktop 2. Xvfb - Wikipedia
使用 qemu (or KVM) 建立 debian VM
2014-10-30
有很多工具可以用來建立 Virtual Machine ,例如 VirtualBox, VMware, LXC, Qemu, Qemu with KVM, Xen 等等。
QEMU - Debian Wiki 簡單的介紹了如何使用 Qemu 來運行虛擬環境
使用現有 Image
Debian developer Aurelien Jarno 提供了數個預先建立的 Image https://people.debian.org/~aurel32/qemu/,這邊我使用 amd64 的架構做示範幾種啟動虛擬環境的方式:
開啟 QEMU,預設使用 SDL 顯示 guest OS 的畫面
qemu-system-x86_64 -hda debian_wheezy_amd64_standard.qcow2 -m 256- 開啟 QEMU,使用 terminal 操作虛擬環境 (一般PC上開機約180秒)
bash
qemu-system-x86_64 -hda debian_wheezy_amd64_standard.qcow2 -m 256 -curses
- 開啟 QEMU,使用 terminal 操作虛擬環境 (一般PC上開機約180秒)
開啟QEMU,並將 host OS port 5555 的封包轉送給 Guest OS 的 port 80
qemu-system-x86_64 -hda debian_wheezy_amd64_standard.qcow2 -m 256 -curses -redir tcp:5555::80- 開啟QEMU,並且開啟 kvm full virtualization support。如果 kernel,processor 有支援,將大大提昇虛擬環境運行速度。這項操作需 root 權限。 (一般PC上開機約30秒,可大大看出 -enable-kvm 的差異)
bash
qemu-system-x86_64 -hda debian_wheezy_amd64_standard.qcow2 -m 256 -curses -enable-kvm
- 開啟QEMU,並且開啟 kvm full virtualization support。如果 kernel,processor 有支援,將大大提昇虛擬環境運行速度。這項操作需 root 權限。 (一般PC上開機約30秒,可大大看出 -enable-kvm 的差異)
特別注意的是我這邊沒有特別對網路做設定,根據 Documentation ,TCP, UDP可以運作,但ICMP 不會。我實際測試的結果確實是如此。(Note - if you are using the (default) SLiRP user networking, then ping (ICMP) will not work, though TCP and UDP will. Don’t try to use ping to test your QEMU network configuration!)
自已建立 qemu image
- 我們也可以選擇自己使用 debootstrap 建立 debian base system。debian.org - Installing Debian GNU/Linux from a Unix/Linux System 這篇文章提供了很好的教學,差別只在於我們的硬碟為一個虛擬硬碟。步驟:
建立虛擬硬碟
dd if=/dev/zero of=rootfs.img bs=1G count=2- 格式化虛擬硬碟為 ext4
bash
mkfs.ext4 rootfs.img
- 格式化虛擬硬碟為 ext4
mount 虛擬硬碟 (需要 root 權限)
mount -o loop rootfs.img /mnt- 執行 debootstrap (需要 root 權限)
bash
debootstrap --no-check-gpg --arch=amd64 wheezy /mnt/ http://debian.nctu.edu.tw/debian/
- 執行 debootstrap (需要 root 權限)
查詢虛擬硬碟的 UUID,我這邊是”4cc6834a-df20-4cb3-ad55-79433346e000”
blkid rootfs.imgrootfs.img: UUID=“4cc6834a-df20-4cb3-ad55-79433346e000” TYPE=“ext4”
- 填寫 /etc/fstab,讓虛擬機開機時就會 mount 虛擬硬碟
bash
echo "UUID=4cc6834a-df20-4cb3-ad55-79433346e000 / ext4 0 1" >> /mnt/etc/fstab
- 填寫 /etc/fstab,讓虛擬機開機時就會 mount 虛擬硬碟
chroot 進 /mnt,安裝 linux kernel,安裝並設定 grub bootloader。結束後退出 chroot 環境。(需root權限)
chroot /mnt
apt-get update
apt-get install -y linux-image-amd64
apt-get install -y grub-pc
grub-install /dev/hda
update-grub
exit
umount 虛擬硬碟 (需 root 權限)
umount /mnt至此,rootfs.img裡面就是一個完整的 debian OS 了。可以用前面所說的方法,以 qemu 開啟。也可以將這個虛擬硬碟轉換為 qcow2 格式,可以佔用較小空間(但虛擬作業系統跑起來的時候則需多花一些計算效能)。 ```
qemu-img convert -f raw -O qcow2 rootfs.img mydebian.qcow2 ```
Ref: - QEMU - Debian Wiki - QEMU - ArchWiki - debian.org - Installing Debian GNU/Linux from a Unix/Linux System - QEMU/Networking - Creating a Debian Based QEMU Image
Update: Linaro 有提供 Debian Jessie 8.0 的 image: http://images.validation.linaro.org/kvm/jessie.img.gz
在 Archlinux 上啟動Avahi-daemon
2014-10-28
這篇回覆介紹了如何在 Archlinux 上使用 systemd 來開啟 avahi-daemon,使得區域網路內的電腦可以用 .local 來連線到其它電腦。
pacman -S avahi nss-mdnsInstalls the Avahi services daemon and the Multicast DNS resolver. nano /etc/nsswitch.conf This file tells the C library how to obtain name-service information.- Change the line
hosts: files dns myhostnametohosts: files mdns_minimal [NOTFOUND=return] dns myhostname, save and exit. systemctl start avahi-daemonStarts the Avahi service manually since we’re already booted.look for errors)systemctl enable avahi-daemonEnables the Avahi service on boot.
用python fcntl 取得 file lock
2014-09-23
在 Stack Overflow 上看到的問答。稍微修改了一下為可執行的版本,下面的Python程式碼可以對一個檔案做lock。同時執行2個這樣的 python script,先取得 file lock 的 process 可以順利印出 “No error”,沒取得 file lock 的 process 則會得到 IOError, 印出 “can’t immediately lock the file” 後結束程式。
#!/usr/bin/env python
# -*- coding: utf-8 -*-
import fcntl
import time
f = open('/tmp/locktest', 'r')
try:
    fcntl.flock(f, fcntl.LOCK_EX | fcntl.LOCK_NB)
except IOError:
    print("can't immediately lock the file")
else:
    print("No error")
    time.sleep(10)
f.close()
先取得 file lock 的 process:
# python test.py
No error
沒取得 file lock 的 process:
# python test.py
can't immediately lock the file
離 Python System Programming 更近一步了!
Setup Domain Controller on Ubuntu 14.04
2014-09-22
在ubuntu 14.04 上架設 Samba Domain Controller 的步驟: 1. 安裝 samba libpam-smbpass
sudo apt-get install samba libpam-smbpass
samba 版本目前是4.1.6 (4.0以上的 Samba 才有提供 Domain Controller 的功能)
samba -V
Version 4.1.6-Ubuntu
使用 samba-tool 一步一步設定,這裡我規劃 samba domain 的網域為 mysamba.test.io
samba-tool domain provision --use-rfc2307 --interactive
設定成功,過程的設定記錄如下:
vagrant@vagrant-ubuntu-trusty-64:~$ sudo samba-tool domain provision --use-rfc2307 --interactive
Realm: mysamba.test.io
 Domain [mysamba]:
 Server Role (dc, member, standalone) [dc]:
 DNS backend (SAMBA_INTERNAL, BIND9_FLATFILE, BIND9_DLZ, NONE) [SAMBA_INTERNAL]:
 DNS forwarder IP address (write 'none' to disable forwarding) [192.168.1.253]: 192.168.1.253
Administrator password:
Retype password:
Looking up IPv4 addresses
More than one IPv4 address found. Using 192.168.1.2
Looking up IPv6 addresses
No IPv6 address will be assigned
Setting up secrets.ldb
Setting up the registry
Setting up the privileges database
Setting up idmap db
Setting up SAM db
Setting up sam.ldb partitions and settings
Setting up sam.ldb rootDSE
Pre-loading the Samba 4 and AD schema
Adding DomainDN: DC=mysamba,DC=test,DC=io
Adding configuration container
Setting up sam.ldb schema
Setting up sam.ldb configuration data
Setting up display specifiers
Modifying display specifiers
Adding users container
Modifying users container
Adding computers container
Modifying computers container
Setting up sam.ldb data
Setting up well known security principals
Setting up sam.ldb users and groups
Setting up self join
Adding DNS accounts
Creating CN=MicrosoftDNS,CN=System,DC=mysamba,DC=test,DC=io
Creating DomainDnsZones and ForestDnsZones partitions
Populating DomainDnsZones and ForestDnsZones partitions
Setting up sam.ldb rootDSE marking as synchronized
Fixing provision GUIDs
A Kerberos configuration suitable for Samba 4 has been generated at /var/lib/samba/private/krb5.conf
Setting up fake yp server settings
Once the above files are installed, your Samba4 server will be ready to use
Server Role:           active directory domain controller
Hostname:              vagrant-ubuntu-trusty-64
NetBIOS Domain:        MYSAMBA
DNS Domain:            mysamba.test.io
DOMAIN SID:            S-1-5-21-711469164-2329730621-2401598146
附註:在使用 samba-tool 的過程式如果有設定錯誤,想再進行一行 samba-tool 操作,會出現錯誤訊息,提示你必須把 /var/lib/samba/private/sam.ldb /etc/samba/smb.conf 刪除,讓 samba-tool 來重新建立
sudo rm /var/lib/samba/private/sam.ldb
sudo rm /etc/samba/smb.conf
Ref: Samba AD DC HOWTO
編譯 Upstart 1.13.2
2014-09-20
編譯 Upstart 1.13.2:
sudo apt-get install libnih-dbus-dev libjson-c-dev
cd upstart 1.13.2/
./configure
make
編譯完成後,會得到以下的執行檔,這樣就得到一組 userspace 上開關機所需要的 utility 了
init/init
util/initctl
util/reboot
util/runlevel
shutdown
telinit
upstart-event-bridge
upstart--bridge
upstart-dbus-bridge
upstart-socket-bridge
upstart-local-bridge
Interactive map of Linux kernel
2014-09-19
博大精深的 Linux kernel

GNU Autotools自動編譯
2014-08-30
在開發 Open Source 項目時,經常會遇到 Autotools。翻了一下網路文章,覺得這張圖給出不錯的表示。 瘋狂駭客的技術隨筆 - 使用GNU Autotools自動編譯項目
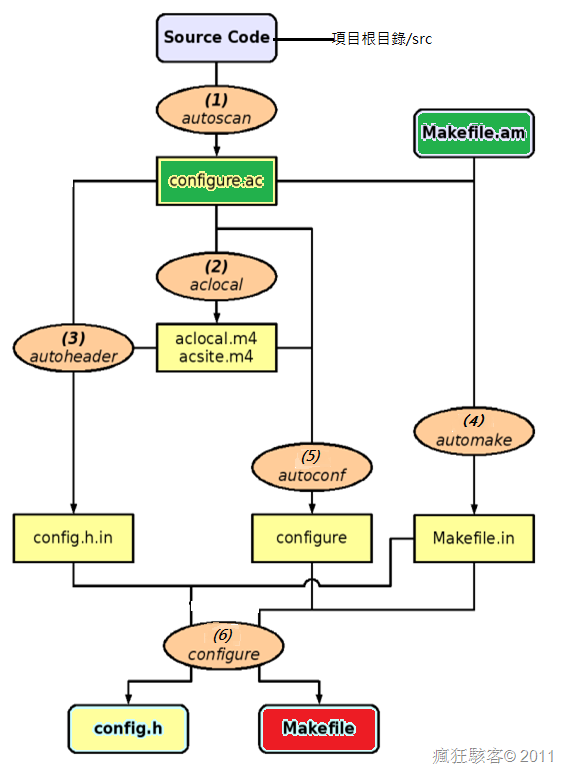
圖中橢圓形狀的就是gnu autotools里的主要工具了,包括1autoscan2aclocal3autoheader4automake5autoconf等.而方形形狀只有Makefile.am和configure.ac是需要我們寫的,别的方框里除了Makefile是最終的配置文件,其它都是中間文件。(Makefile文件是由6configure生成的)
今天在c9s的 facebook 上看到這個,才發現有這種用法。
http://stackoverflow.com/questions/9834689/comparing-two-branches-in-git 原來還有這種用法 two dots 跟three dots 是不一樣的
# produce the diff between the tips of the two branches.
git diff branch_1..branch_2
# use three dots instead of two to find the diff from their common ancestor
git diff branch_1...branch_2